Android: take a picture without displaying a preview
Posted by Dimitri | May 4th, 2011 | Filed under Programming
Accessing hardware functionality when programming for an Android device is generally quite straightforward. The same can be said about writing an Activity that takes a picture, but Android requires a preview of what the camera will capture to be displayed prior to capturing an image. This post explains how to “cheat” this requirement imposed by the OS, and how to write an application that takes a picture and displays it.
An Eclipse project with all the code explained here is available for download at the end of the post.
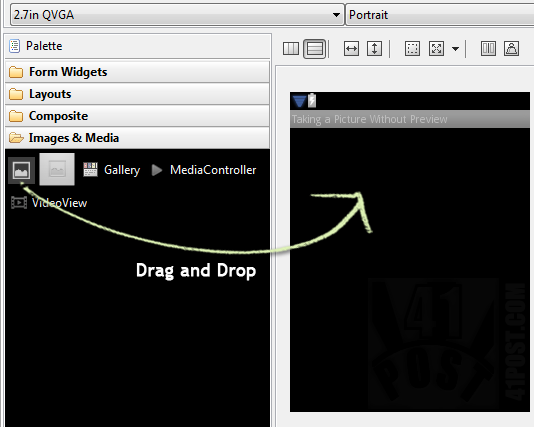
Before going into the Activity code, the interface layout (the main.xml file) must be edited to add a Surface View and an Image View to the interface. To add an element, just drag and drop it from the list inside your layout, like this:

Just drag and drop a View inside the screen layout to add it. Repeat the same process to add the Surface View
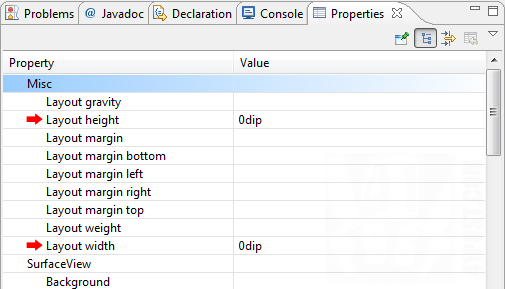
After including a Surface View (located inside the Advanced folder) and Image View (inside Images & Media) to your layout, select the Surface View and click on the properties tab and set the Layout width and Layout Height properties to 0dip, as shown:

Set these both Surface View properties as '0dip'.
With these properties set to 0dip (zero + “dip”), the Surface View that will render the preview will be displayed, meeting Android requirements, although its width and height are going to be zero. Note that the Image View was added just to display the image after it has been captured. It’s not a necessary component.
Now, here’s the Activity code that will take a picture immediately after it’s launched:
package fortyonepost.com.pwop;

import java.io.IOException;

import android.app.Activity;
import android.graphics.Bitmap;
import android.graphics.BitmapFactory;
import android.hardware.Camera;
import android.hardware.Camera.Parameters;
import android.os.Bundle;
import android.view.SurfaceHolder;
import android.view.SurfaceView;
import android.widget.ImageView;

public class TakePicture extends Activity implements SurfaceHolder.Callback
{
	//a variable to store a reference to the Image View at the main.xml file
	private ImageView iv_image;
	//a variable to store a reference to the Surface View at the main.xml file
    private SurfaceView sv;

	//a bitmap to display the captured image
	private Bitmap bmp;

	//Camera variables
	//a surface holder
	private SurfaceHolder sHolder;
	//a variable to control the camera
	private Camera mCamera;
	//the camera parameters
	private Parameters parameters;

    /** Called when the activity is first created. */
    @Override
    public void onCreate(Bundle savedInstanceState)
    {
        super.onCreate(savedInstanceState);
        setContentView(R.layout.main);

        //get the Image View at the main.xml file
        iv_image = (ImageView) findViewById(R.id.imageView);

        //get the Surface View at the main.xml file
        sv = (SurfaceView) findViewById(R.id.surfaceView);

        //Get a surface
        sHolder = sv.getHolder();

        //add the callback interface methods defined below as the Surface View callbacks
        sHolder.addCallback(this);

        //tells Android that this surface will have its data constantly replaced
        sHolder.setType(SurfaceHolder.SURFACE_TYPE_PUSH_BUFFERS);
    }

	@Override
	public void surfaceChanged(SurfaceHolder arg0, int arg1, int arg2, int arg3)
	{
		 //get camera parameters
		 parameters = mCamera.getParameters();

		 //set camera parameters
	     mCamera.setParameters(parameters);
	     mCamera.startPreview();

	     //sets what code should be executed after the picture is taken
	     Camera.PictureCallback mCall = new Camera.PictureCallback()
	     {
	    	 @Override
	    	 public void onPictureTaken(byte[] data, Camera camera)
	    	 {
	    		 //decode the data obtained by the camera into a Bitmap
	    		 bmp = BitmapFactory.decodeByteArray(data, 0, data.length);
	    		 //set the iv_image
	    		 iv_image.setImageBitmap(bmp);
	    	 }
	     };

	     mCamera.takePicture(null, null, mCall);
	}

	@Override
	public void surfaceCreated(SurfaceHolder holder)
	{
		// The Surface has been created, acquire the camera and tell it where
        // to draw the preview.
        mCamera = Camera.open();
        try {
           mCamera.setPreviewDisplay(holder);

        } catch (IOException exception) {
            mCamera.release();
            mCamera = null;
        }
	}

	@Override
	public void surfaceDestroyed(SurfaceHolder holder)
	{
		//stop the preview
		mCamera.stopPreview();
		//release the camera
        mCamera.release();
        //unbind the camera from this object
        mCamera = null;
	}
}
This code first declares the variables that will act as handles to the Surface View and the Image View at the main.xml file (lines 18 to 20). Then, a Bitmap object is declared, and it will be used to display the image after it has been captured (line 23). After that, 3 objects are declared: a SurfaceHolder, that will allocate a part of the screen to render the camera preview (which has 0 width and height); a Camera that will handle the device’s camera; and a Parameters object, that will be used to set the camera’s settings (lines 27 through 31).
Moving on to the onCreate() method, it basically initializes all the declared objects by getting a reference to other existing ones, like the sv object that will make a reference to the SurfaceView in the main.xml file. There are two lines inside this method that need a more detailed explanation. Line 50 sets the Surface Holder callback to this, because this class is implementing the SurfaceHolder.Callback interface, that has the purpose of controlling the rendering of a “surface” (a area of the screen). This is required so that the “preview” works. The other important line is the 53rd one, that tells Android that this surface will be having all its data being replaced.
The SurfaceChanged() method is where it all happens. The parameters object is initialized (line 60). Not only that, the camera parameters are set, and the preview is started (lines 63 and 64). The picture callback is defined, it’s code being called every time a picture is taken (lines 67 through 77). Inside it, the data captured by the camera is decoded into the Bitmap object (line 73) and right after that, line 75 tells the ImageView to display this Bitmap. At the end of the method, the camera is requested to take a picture, using the recently created callback (line 79).
The code inside the surfaceCreated() method hooks the camera object to the device’s camera. It also tells where the camera should preview its capture (lines 83 through 95). The last one, method surfaceDestroyed() releases the camera, so it can be used by other applications (lines 98 through 106).
It’s a pretty standard camera capturing code. What hides the preview is the width and height of the Surface Holder, that are set to zero. The last requirement needed to make it work is to add a permission to access the camera to the AndroidManifest file:
<uses-permission android:name="android.permission.CAMERA"></uses-permission>


Nice code.. work OK… just one question… where is the image save?
OR HOW TO DO THAT?
Hi Friends, In my application i have to generate some graphs when i will put my finger on back camera… The moment i will put my finger, it will only retrieve the parameters like rgb,height,width etc and according to that it will have to generate a graph called ECG…
There will be no image or preview the camera has to show…. Please if any one have any solution share with me… Its urgent..
Thanks. though, it doest work with 0dip, you must use at least 1dip.
I tried your code but it worked for the first time but later when i executed same program after some days it is not calling surfaceCreated or surfaceChanged functions,i am not understanding what went wrong
This was really helpful. but I need to know how I can write the output to file on sdcard. Thanks!
I found this app that does exactly what this code does, its called AutoPIX….
https://play.google.com/store/apps/details?id=com.kineticglobe.autopix
I imported and ran your project, but it dint work,..
The picture is not been captured. I’m trying on Samsung S4 device. Any idea?