Game Programming Basics: Moving an element
Posted by Dimitri | Dec 28th, 2010 | Filed under Programming

This post explains some of the most basic game programming techniques: how to move elements on the screen. If you already know this, please skip it, or add something to this post in the comments. Since these lines of codes are trivial to game programming, it may be one of the reasons why it is so hard to find a post or a website explaining them. The code presented on this post isn’t the only way to move objects in a game and certainly there is a lot more information out there. The intention of this post is to serve as a starting point.
In terms of programming, basically, what you do in a game is move elements on the screen with some rules (of course there is a lot more than that). This rules are dictated by the physics, the rules of the game itself and specially, some game constrains to make it fun. So, in a 2D game, to move a object, we have to somehow access the code that draws a graphical element in a certain position of the screen. Secondly, we need variables to store the element’s position. On top of that, we also need another set of variables to define the speed of the moving element.
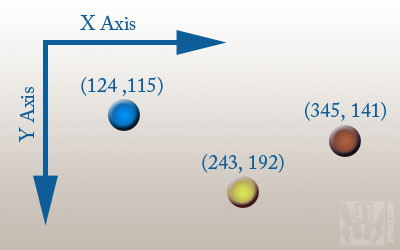
Additionally, when starting programming games, it is recommended to treat X and Y axis separately. It helps you to see what is going on, and it is easier to debug the code. Generally, the X (horizontal) axis points to the right and the Y (vertical) axis points down as shown:

Screen orientation. Numbers indicate the position of each element on the X and Y axis.
So, an object that has a Y position of 1 is closer to the top of the screen than a object that has a Y position of 5.
To move elements on the screen, just increment the variables that store the element’s position. This increment is the velocity, which is added every frame, and stored again at the position variables. Let’s see how to move these objects in the horizontal and vertical axis, as an example:
Moving elements left or right
To move objects to the left or right we need:
- A variable that stores the X position (posX).
- A variable to increment the X position (velX).
And the code will be:
//Sets the X velocity. This value is how many pixels the element will move on a single frame update
velX = 4;

//move element to the right
posX = posX + velX;

//move element to the left
posX = posX - velX;
To make the object move horizontally with a key press, just capture the key press event in your platform and add one of the above lines of code. If you want the object to move automatically to the left or right, just add one of the lines inside your Update() method, which is the method that is called once per frame.
Moving elements up or down
To move objects up or down, we need the following:
- A variable that stores the Y position (posY).
- A variable to increment the Y position (velY).
//Sets the Y velocity. This value is how many pixels the element will move on a single frame update
velY = 4;

//move element down
posY = posY + velY;

//move element up
posY = posY - velY;
To make the object move vertically with a key press, just capture the key press event in your platform and add one of the above lines of code. If you want the object to move automatically up or down, just add one of the lines inside your Update() method, which is the method that is called once per frame.
Diagonals
To move diagonally just increment the posX and the posY variables at the same update cycle, like this:
velX = 4;
velY = 4;

Update()
{
    //moving diagonally down/left
    posX = posX - velX;
    posY = posY + velY;
}
Simple Inertia
The above examples, when not being executed, makes the object stop immediately. To add some inertia to the movement, we have to change the code to:
//set velX and velY to 0
velX = 0;
velY = 0;

Update()
{
    //remove 5% from the total velocity
    velX = velX *0.95;
    velY = velY *0.95;
    //add this velocity to the position
    posX = posX + velX;
    posY = posY + velY;
}

//And then, add the following lines to your input method (if you want to move the object with button presses):
void keyPressed()
{
    //Right
     if (keyCode == RIGHT)
     {
       velX++;
     }
     //Left
     if (keyCode == LEFT)
     {
       velX--;
     }
     //Down
     if (keyCode == DOWN)
     {
       velY++;
     }
     //Up
     if (keyCode == UP)
     {
       velY--;
     }
}
Examples and Downloads
- Click here to see a online example.
- Download the source code. You will also need to download Processing in order to test the source code locally (it doesn’t need to be installed, just download, extract and run processing.exe).
And that’s it! Comments are greatly appreciated.
Be the first to leave a comment!


