Unity3D: Non-rectangular GUI buttons – Part 2
Posted by Dimitri | Jan 15th, 2011 | Filed under Programming
This post series explains how to create non-rectangular shaped buttons in Unity3D. This is the second part, so if you missed the first one, it is almost required that you read it here. The first post explained how to set up the 2D image, and then, make a 3D model out of it to serve as hit test area. This 3D model is necessary because we are going to use Unity3D’s Raycast collision detection do make the buttons.
This post will explain all the steps necessary to prepare the Unity3D scene to receive the non-rectangular GUI code.
Before importing the 2D images and the 3D model on the scene, we need a new camera object that will be used to render only our 3d model and use it as a hit test area. So, go to GameObject -> Create Other -> Camera. Leave it at the root of the scene, and change its name to GUI Camera. After that, change the following Camera properties:
- Set Clear Flags to Depth Only.
- Assign a small number to the Far clip plane. Something like10 will do.
- Mark the Orthographic check box.
- Make the depth greater than the Main Camera.
After changing these settings, your GUI Camera should be looking like this:
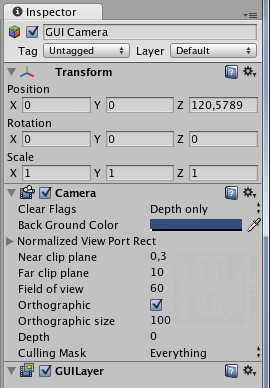
GUI Camera settings.
Don’t forget to delete the Audio Listener component. Unity3D only takes one single Audio Listener per scene. Next, click on the Layer dropdown menu (right down under the Camera’s name) and then on the Add Layer… option. It will open the Tag Manager. There, give the name of IrregularShapeGUI to a free Layer Slot to create a new layer, like this:
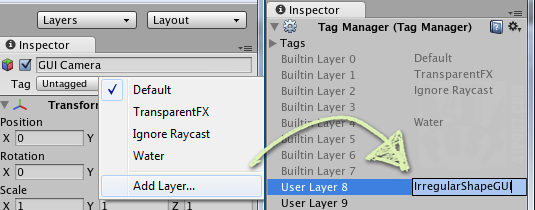
Click on the 'Add Layer...' and then, assign a name to a unused slot to create a new layer.
Still on the GUI Camera Inspector, mark only the IrregularShapeGUI as this camera’s culling mask, as shown:
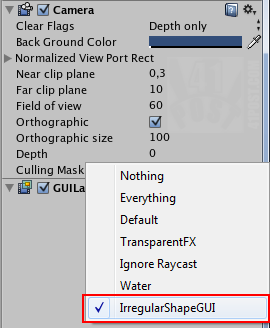
Select only the 'IrregularShapeGUI' as this camera's Culling Mask.
Finally, add the 3D model to the Project tab. Unity3D takes a few seconds to import the 3D model. After it appears inside your Project tab, select it and mark the Generate Colliders check box located at the Inspector:
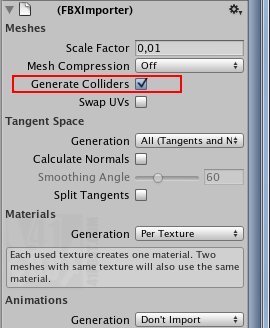
Don't forget to generate the colliders for the 3D model.
Now comes one important part: as we want only the GUI Camera to render the 3D hit test object, and the Main Camera to ignore it. To achieve that, place the 3D object in the scene within the GUI Camera’s range. Both camera and 3D object must be placed somewhere that the player can’t reach, like under the Terrain or floating over the level, to make sure there is absolutely no chance of an accidental collision with it. After the hit test model has been properly placed in the scene, select it in the Hierarchy tab and set it to be part of the IrregularShapeGUI layer, as shown:
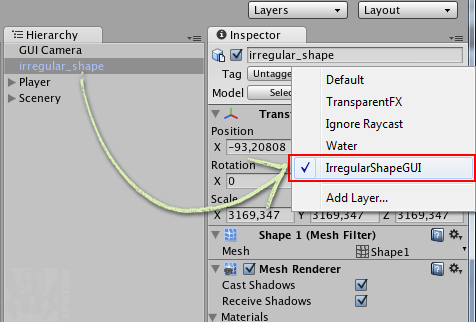
Select the 3D model and make it part of the 'IrregularShapeGUI' layer.
The last thing that needs to be changed in the scene is the Main Camera that needs to ignore the 3D hit test object. To make that happen, select all layers except the IrregularShapeGUI, which contains the hit test object:
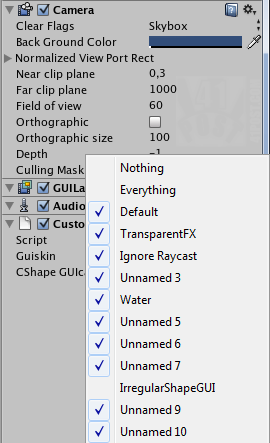
Select every layer except the one we have just created ('IrregularShapeGUI)'.
That’s all that is needed on the scene. Just a quick recap on what was done in this post:
- A new layer(IrregularShapeGUI) was created, it has only the 3D hit test model.
- A orthographic, Depth only camera was created exclusively to render this 3D model as a 2D object.
- The Main Camera renders everything, except the objects placed in the newly created layer (all objects placed inside the IrregularShapeGUI layer are ignored).
The next and final post of this series will explain all the code aspect and final adjustments that need to be made to make non-rectangular buttons work on Unity3D. You can read it here: Part 3 – The code and an example project.
Be the first to leave a comment!


