Unity3D: Non-rectangular GUI buttons – Part 3
Posted by Dimitri | Jan 17th, 2011 | Filed under Featured, Programming
This is the last post of this series, which explains how to create non-rectangular GUI buttons for Unity3D games. If you haven’t read any of the other posts yet, it is highly recommended that you take a look at part one and part two before going any further.
So, let’s start from where the second post left: we already have our Unity3D scene set up with the 3D hit test model already imported and placed inside the scene. All we have to do now is import the PNG images and make then appear as a GUI element. To do that, just drag and drop then somewhere inside the Project tab. After the images are inside Unity3D, create a GUISkin by right clicking an empty space in this same tab and select Create->GUISkin as shown:
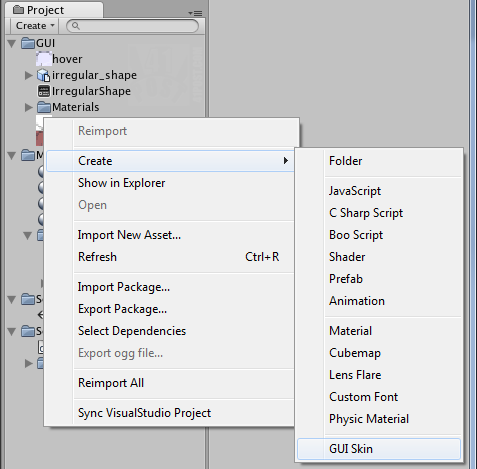
Click on \’Create\’ and then on \’GUISkin\’
Name this GUISkin as IrregularShapeSkin. The next step is to add the images we just imported to the recently created GUISkin. To do this, each state of the button, such as normal, hover and down must be assigned to a different Custom Styles slot. To do that, expand the Custom Styles tree and set the size to 3 or whichever number of buttons or button states you currently have. Then, just drag and drop the images from the Project Tab to the Normal->Background of each slot:
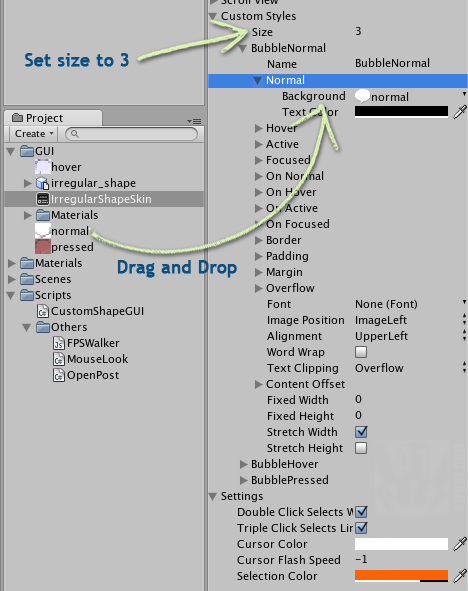
This image shows how to assign a image to a Custom Style slot.
Finally, let’s see the code that makes the non-rectangular buttons work. The code is much simpler than the scene’s setup we’ve being preparing all these posts. It must be attached to the Main Camera. Here it is:
using UnityEngine;
using System.Collections;

public class CustomShapeGUI : MonoBehaviour
{
	//a variable to store the GUISkin
	public GUISkin guiskin;
	//a variable to store the GUI camera
	public Camera cShapeGUIcamera;

	//a variable that is used to check if the mouse is over the button
	private bool isHovering = false;

	//a variable that is used to check if the mouse has been clicked
	private bool isDown = false;

	//a ray to be cast
	private Ray ray;

	//create a RaycastHit to query information about the collisions
	private RaycastHit hit;

	void Update()
	{
		//cast a ray based on the mouse position on the screen
		ray = cShapeGUIcamera.ScreenPointToRay(Input.mousePosition);

		//Check for raycast collisions with anything
        if (Physics.Raycast(ray, out hit, 10))
		{
			//if the name of what we have collided is "irregular_shape"
			if(hit.transform.name=="irregular_shape")
			{
				//set collided variable to true
				isHovering = true;

				//if the mouse buton have been pressed while the cursor was over the button
				if(Input.GetButton("Fire1"))
				{
					//if clicked, mouse button is down
					isDown = true;
				}
				else
				{
					//the mouse button have been released
					isDown = false;
				}
			}
        }
		else //ray is not colliding,
		{
			//set collided to false
			isHovering = false;
		}
	}

	void OnGUI()
	{
		//if mouse cursor is not inside the button area
		if(!isHovering)
		{
			//draws the normal state
			GUI.Label(new Rect(10,10,161,145),"",guiskin.customStyles[0]);

			//set mouse click down to false
			isDown = false;
		}
		else //mouse is inside the button area
		{
			//draws the hover state
			GUI.Label(new Rect(10,10,161,145),"",guiskin.customStyles[1]);

			//if the mouse has been clicked while the cursor was over the button
			if(isDown)
			{
				//draws the 'Pressed' state
				GUI.Label(new Rect(10,10,161,145),"",guiskin.customStyles[2]);
			}
		}
	}
}
This is how this code works: the public variables define the Camera that the ray will be cast into and the GUISkin being used. Don’t forget to drag and drop the Camera and specially the GUISkin we created yearlier before running the code. If you don’t, the lack of a defined GUISkin can make Unity3D crash. This is a image of the cShapeGUIcamera variable and the guiskin variable set up, and defined, at the Inspector.
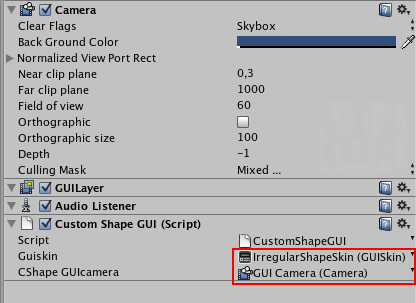
Image of the Main Camera Inspector showing the CustomShapeGUI script attached to it. Don\’t forget to assign these variables.
The private variables are used to create the ray, set the button states (normal, hover, pressed) and to query information about the object the ray collided with (that’s the purpose of the RaycastHit variable named hit). Actually, for this example, this RaycastHit variable wasn’t needed, since we only have one button. It was added to the script to make it possible to add more buttons later.
Basically, the Update() method checks for objects intersecting the ray within a 10 unit range (line 29). The ray has its origin in the dedicated GUI Camera and points forward. The ray’s origin and direction are updated every frame (line 26). If there was a collision, check what is the name of the object we collided with, and then, set the state of the button based on the mouse button input (if statement that starts in line 29 and and ends on line 49).
Finally, the OnGUI() renders the button on the screen at a specified coordinate and with the current state based on the the three boolean variables.
Since the code defines where the button is drawn on the screen, the last thing needed to be done is to scale and place the “irregular shape” 3D model exactly behind the 2D GUI. The 3D model will serve as the hit test area for the button, that’s why it needs to be placed precisely behind the 2D GUI, so it doesn’t appear.
3D model being positioned behind the 2D GUI Image.
The image above shows the 3D hit test area model being aligned with the 2D image. Note that the button’s PNG file isn’t transparent. The image above is like this, because, to precisely position the 3D hit test model, this line of code was added at the beginning of the OnGUI() method to make all GUI elements semi-transparent.
//place this line at the beginning of the OnGUI method
GUI.color = new Color(0.5f,0.5f,0.5f,0.5f);
After you found the position and size to match the 2D image, just delete this line.
Update Nov/16/2012: As far as the code goes, Unity now features a pair of methods that can detect collisions with the mouse cursor in screen space with an object in world space. This means that casting a ray to see which object is being hit isn’t necessary anymore. Check out the official documentation for the MonoBehaviour.onMouseEnter() and MonoBehaviour.onMouseExit() methods.
As promised in the first post of this series, here is a Unity3D project with all the images, code and 3D model:
Please run this in the Web or the Standalone resolutions, as this code doesn’t resize the GUI or the 3D model based on the screen resolution. This isn’t an error, just a limitation. It would have required much more code to implement this feature, and at least one more post to explain it.
That’s it!


Thanks for putting this up, and for the update with the new methods. This is very helpful for the project I’m working on.