Unity3D: Programming a machine gun – Part 2
Posted by Dimitri | Feb 5th, 2011 | Filed under Featured, Programming
This is the second and last post of this series that explains how to code a machine gun in Unity3D. The first post explained how to make the automatic firing mechanism, and this one will focus on how to set-up the machine gun, the bullet and explain the code that makes it all work. Also, a Unity3D project with all the source code discussed on the series is available for download at the end of the post.
So, let’s start by setting the machine gun. The 3D model of the gun can be any one, you don’t even have to create a 3D model at all, it is possible to use Unity3D’s cubes and other primitives. The only thing that one must know is that the muzzle of the gun must be a completely separate element. This is crucial when making the gun at an external 3D modeling application such as 3D Studio Max, Blender or XSI. The muzzle must be separated from the rest of the gun because the bullets are going to be instantiated at its position. If the gun was already modeled, don’t worry: you can add a cube game object as a child of the gun, position it as the muzzle, and then disable the Mesh Renderer component at the Inspector.
This is how the machine gun Hierarchy should look like:
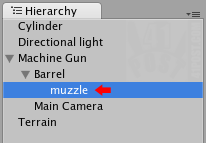
Look at the muzzle. It's a separated game object.
The last precaution to take is to delete the Collider component from the muzzle as we don’t want the bullets colliding with it. That’s all there is to do to set-up the machine gun.
Now, for the bullets, just create a capsule game object. Then add a Trail Renderer component (Component -> Particles -> Trail Renderer) and set the Autodestruct check box to true and Time, Start Width and End Width to 0,1. Also, add a Rigidbody component, and make sure that the Use Gravity check box is also selected. As most of the Trail Renderer’s settings, set the Mass to 0,1 in the Rigidbody component.
Here’s how the bullet’s Rigidbody and Trail Renderer components should appear on the Inspector, after all settings have been configured:
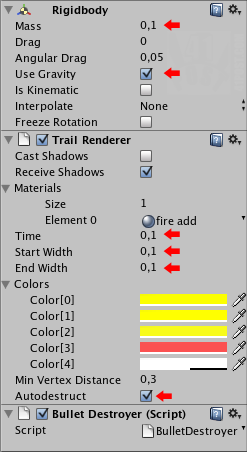
These are the bullet settings.
Some of you may have noticed that there is also a Bullet Destroyer script attached to this game object. Don’t worry, it will be explained later. The next step is to create a prefab and put a bullet in it. To do that, right-click anywhere at the Project tab. Then select Create -> Prefab. Name it as ‘Bullet’, now drag and drop the Bullet game object from the Hierarchy tab inside it. Done! The prefab has been created. The only way that scripts can have access to it is to place the prefab in the ‘Resources’ folder. It is probably not there yet, so create it by right-clicking anywhere at the Project tab and selecting: Create -> Folder.
This is the image of the Bullet prefab inside the Resources folder:
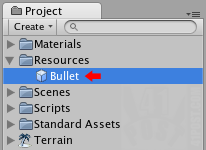
This is where the 'Bullet' prefab should be placed after it has been created.
Finally, let’s get to the scripts. To make the machine gun shoot bullets, we are going to use the same script from the first post, except this time we are going to add more variables to instantiate the bullet at the desired position and rotation. Here it is:
using UnityEngine;
using System.Collections;

public class MachineGun : MonoBehaviour
{
	//a Transform that is used to instantiate the bullet
	public Transform muzzleTransform;
	//a variable to store the Bullet game object loaded from the Resources folder
	private GameObject bullet;
	//A variable that serves as a handle to the newly instantiated bullet
	private GameObject instantiatedBullet;
	//This Quaternion defines the rotation of each instantiated bullet
	private Quaternion bulletRotation = new Quaternion(0.7f,0,0,0.7f);

	void Awake()
	{
		//load the 'Bullet' prefab from the resources folder
		bullet = (GameObject)Resources.Load("Bullet");
	}

	// Update is called once per frame
	void Update ()
	{
		//while the "Fire1" button is being held down
		if(Input.GetButton("Fire1"))
		{
			//Start the DelayedShot method as a coroutine
			StartCoroutine("DelayedShot",0.2f);
		}
	}

	//A method that returns a IEnumerator so it can be yield
	IEnumerator DelayedShot(float delay)
	{
		//wait for the time defined at the delay parameter
		yield return new WaitForSeconds(delay);
		//instantiate the bullet at the gun's muzzle
		instantiatedBullet = (GameObject)Instantiate(bullet, muzzleTransform.position, muzzleTransform.rotation * bulletRotation);
		//add velocity to the bullet
		instantiatedBullet.rigidbody.velocity =  muzzleTransform.TransformDirection(Vector3.forward * 75 );
		//Stop this coroutine
		StopCoroutine("DelayedShot");
	}
}
The muzzleTransform variable is used to instantiate the bullet at the end of the gun’s muzzle. There is also two Transform variables (bullet and instantiatedBullet), that are used to load the ‘Bullet” prefab from the resources folder and act as a handle to the recently instantiated bullet. The Quaternion at line 13 forces all bullets to be instantiated with the correct rotation.
The Awake() method loads the ‘Bullet’ prefab and stores it into the bullet variable (line 18).
At the Update() method, there is only one if statement that is used to check if the ‘Fire1’ button has been pressed or if it is being held down. If it does, it executes the DelayedShot() method. This is the method that makes the machine gun shoot.
In line 38, a new bullet gets instantiated by cloning the game object stored at the bullet variable. This new bullet is placed at the muzzleTransform.position and rotated to be at the current gun’s rotation and parallel to its barrel. To achieve this, we multiply the current Quaternion with the one we defined earlier, that’s why we have : muzzleTransform.rotation multiplied by bulletRotation.
If the code was left like this, the bullets would simply appear at the gun’s muzzle and fall straight into the ground. That’s the reason why we add velocity to them at line 40. The velocity is added along the gun’s z axis.
Lines 36 and 42 are responsible for making the automatic firing behavior, and are explained with more details at the first post of this series.
That’s it! Now we attach this script to the parent game object of the machine gun and set the muzzleTransform variable in Unity3D by dragging and dropping the Transform we want to use as the reference to instantiate the bullets.
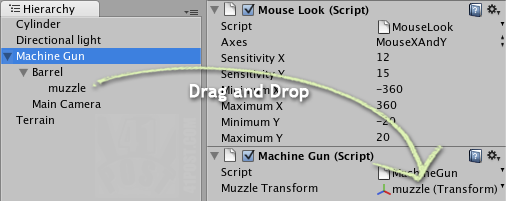
Drag and drop the muzzle game object into the Machine Gun script 'Muzzle Transform' slot.
To be able to aim with the gun using the mouse, just add the Mouse Look script, that comes with in Unity3D’s ‘Standard Assets’ package to the Machine Gun game object.
Since all bullets contain a rigid body component, it is essential that they auto destroy themselves after a certain amount of time to preserve computational resources. This is exactly what the Bullet Destroyer does, destroying each bullet after 3 seconds:
using UnityEngine;
using System.Collections;

public class BulletDestroyer : MonoBehaviour
{
	// Update is called once per frame
	void Update ()
	{
		//if the AutoDestruct() method isn't already being invoked
		if(!IsInvoking("AutoDestruct"))
		{
			//schedule the execution of the AutoDestruct() method to happen in the next 3 seconds
			Invoke("AutoDestruct",3);
		}

	}

	//destroys the game object
	void AutoDestruct()
	{
		Destroy(gameObject);
	}
}
The above code should be self explanatory.
Here’s the Unity3D project with all the code presented in the series, in both C# and JavaScript :


Very nice example to question “WTF is invoke?!”. Many thanks.