Configuring openFrameworks add-ons in Codeblocks
Posted by Dimitri | Mar 5th, 2011 | Filed under Programming

At some point, when using openFrameworks to create interactive applications, one needs to use some of the bundled add-ons. This post will explain how to configure your Codeblocks project to use these add-ons and how to include the OpenCV add-on to your project. Before continuing, you should know there is an automated tool that helps the programmer in this process, specially designed to easily configure openFrameworks projects and add-ons at Google Code: ofcodeblocksplugin (official forum thread here).
Differently from this tool, this post explains on how to manually include the add-ons to your openFrameworks project. The process described here was done using Codeblocks 10.05 and openFrameworks 0.62 on a computer running Windows.
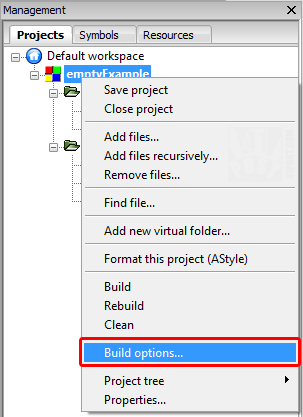
So, to import a add-on, right click the project under the Projects tab, then select Build Options:
The Project Build Options dialog will open, there, click on the third tab, Search Directories, and then press the Add button under the Compiler tab:
After that, click on the “[…]” button. A dialog will open asking you to select a folder. Find the source folder that has the add-on you want to be part of the project. Let’s assume we wanted to include the Thread add-on, so the folder that needs to be selected is the <openFrameworks folder>/addons/ofxThread/src. After you hit OK, it will ask if it should add it as a relative path, click YES:
Click on the OK button one more time to close the Project build options, and that’s it! Now all you need to do is to include the add-on at the beginning of the testApp.h file. Again, using the Thread add-on as an example, the testApp.h would be:
#ifndef _TEST_APP
#define _TEST_APP

#include "ofMain.h"
#include "ofxThread.h"

class testApp : public ofSimpleApp{

//omitted code
//...
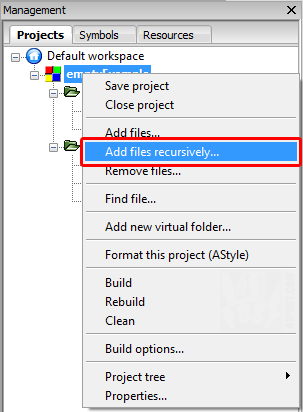
It should already work this way, although you can’t see which classes are available in the add-on, its constructors, variables and methods because they won’t appear inside your Codeblocks project. To make that happen, again, right click the project under the Projects tab, then select Add files recursively:
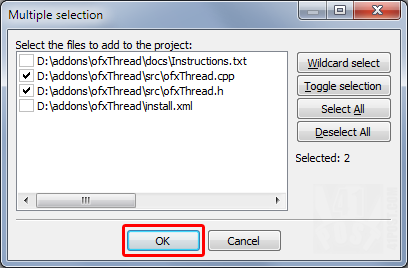
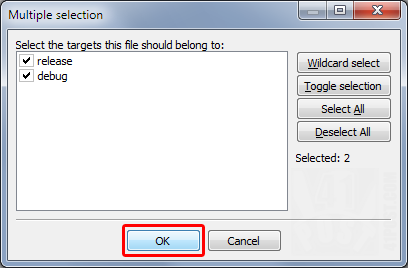
You will be presented with a select folder dialog. Just select your add-on folder, for the Thread add-on, this folder would be <openFrameworks folder>/addons/ofxThread. Another dialog will appear with a list of files that will be imported. Do not change any of the toggle boxes, because Codeblocks already filters header (.h) and class (.c) files. That said, just hit OK in this dialog and in the next one:
Now, we can see the files on the project! Unless you know what you are doing, don’t change their code. Remember, they have been added just so we can open them inside Codeblocks to see their methods and constructors. The process described here works for other openFrameworks add-ons, except the OpenCV.
Configuring Codeblocks with the OpenCV add-on
Adding the OpenCV to Codeblocks is the same as the process described above. Although, there are some additional steps that need to be completed, such as the Search Directories that need to be included under the project’s Build Options. You will need to add not just the source folder as Search Directories, but the following ones listed below:
- <openFrameworks folder>/addons/ofxOpenCV/src (the source folder)
- <openFrameworks folder>/addons/ofxOpenCV/libs
- <openFrameworks folder>/addons/ofxOpenCV/libsopencv/lib/win_cb
- <openFrameworks folder>/addons/ofxOpenCV/libsopencv/lib/include
And you will need to add some pre-compiled libraries. To do that, right-click again on your project, then on Build Options, and select the Linker Settings tab (the second tab). In this dialog, press the Add button and select all the files inside the <openFrameworks folder>/addons/ofxOpenCV/libsopencv/lib/win_cb folder, like this:
Lastly, add the following include at the beginning of your testApp.h header file file:
#include "ofxOpenCv.h"
Don’t forget to include OpenCV add-on files to the project, so it is possible to see how to instantiate and use objects from the OpenCV classes, like described earlier.
That’s it!
Be the first to leave a comment!


