Unity: How to create a GUI Sprite Sheet – Part 1
Posted by Dimitri | Apr 7th, 2011 | Filed under Featured, Programming

This post is the first of a series that explains how to create a GUI sprite sheet (a.k.a. atlas map) in the Unity game engine. This map consists of buttons, text areas, backgrounds and other interface elements joined together to create various joined image files with all interface elements inside it.
Here, the focus will be on how to prepare and create this images at an image editing software, which is the most important step. The next post of this series will explain how to import these images in Unity and place them inside a GUI Skin object.
The first thing to do is to have all the GUI elements needed for the game or specific part of the game. They have to be already created before building the sprite sheet, at least their size have to be already defined. Throughout this post, the following GUI elements will be used to exemplify how to correctly join the images together:

GUI - Background.

Button 1 - Normal.

Button 1 - Active.

Button 2 - Normal.

Button 2 - Active.
After they are all created, it’s just a matter of following these 4 rules:
1. Use square (and power of two) sized images
Just because graphic cards today can handle non-square images, it doesn’t mean they perform equally as a perfectly square, power of 2 image. Quite on the contrary, images that don’t follow these requirements only increase the load for the GPU. Since the GUI sprite sheets tend to get big, with resolutions such as 512x512px or even 1024x1024px, it is a good thing to keep then square and power of two.
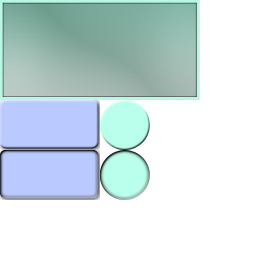
Following this rule, the above images could be joined like this:

All GUI elements on a single image.
2. Separate the GUI images by state and not by GUI element
That said, it’s not possible to create one single sprite sheet with all GUI elements. The reason for that is the code that is going to be explained in the third part of the series. You will have to create a sprite sheet for each state: one for the normal state, other for when the mouse hovers the GUI, and the last one for a pressed (activated) state.
It’s very similar to creating buttons in Flash, the difference is that you are going to join everything into a single image. Our example has only 2 states: normal and pressed (activated), this way, we need two sprite sheets:

Normal State Sprite Sheet.

Active State Sprite Sheet.
The background won’t be added to the normal state sprite sheet, because we would have to repeat it in the activated state sheet. In Unity, even labels can have hover and pressed states. But don’t worry, this is just an example, in a game project you will normally have more than one GUI background. Just create a sprite sheet with backgrounds and other immutable GUI elements.
3. Place the same GUI element at the same coordinate across multiple GUI sprite sheets
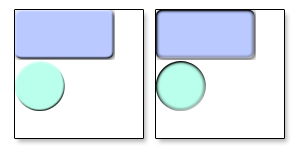
This is also a consequence of how the code is implemented and the way Unity GUI class works. The coordinates for each GUI element throughout the sprite sheets has to be the same. In our example, the images are already correctly placed, so the second button’s normal state in the left image is at the same position as its activated counterpart at the right image:

Side by side sprite sheets. The buttons are at the same position in both sheets. It's a good idea to leave a space of 1 pixel between elements.
4. Some elements can’t be part of the GUI sprite sheet
Not all GUI elements from Unity can be included on a sprite sheet. These are elements that are composed from more than one image, meaning no toolbars, scrollbars, sliders and toggles of any kind. The other GUI elements should work with no problems.
Again, one of the main reasons for that is the code and how the Unity GUI class works. The aforementioned elements have to be created with separate image files, and them set independently at the GUI Skin file.
As for our example, nothing needs to be removed, as it doesn’t contain any of these elements.
That’s it for this post! The next post of the series will explain how to set these images inside a GUI Skin object. Read it here: Part 2 – Configuring the GUI Skin Object.
Be the first to leave a comment!


