Unity: Creating a simple billboard
Posted by Dimitri | Apr 30th, 2011 | Filed under Programming

Sometimes, when creating a game, there is the need to use a billboard. In the Unity game engine there is no billboard rendering component, and that’s why this post is going to explain one of the options to do so, it’s advantages and disadvantages. It’s not going to require a single line of code, but it’s not going to be the most optimized option either. At the end of the post a Unity project with all the game objects and components configured here is available for download.
To make a billboard in Unity, there is basically three different options:
- Create a shader to do that, or
- Attach this script from Unify Community wiki to a game object, or
- Use Unity’s particle system.
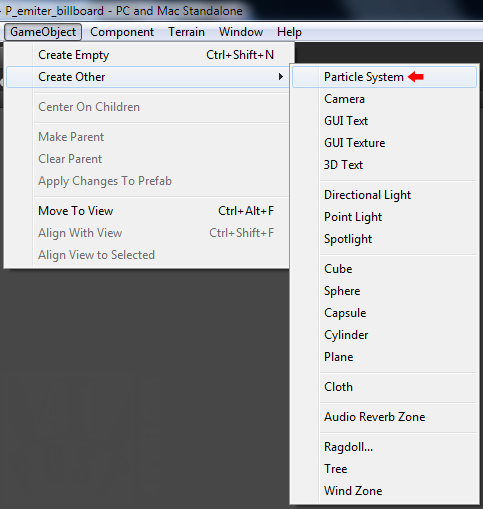
This post is going to explore this last option, which involves creating a particle system and then setting its values at the inspector, so it can emit just a single particle. The first thing to do is to create it, and to do that simply select GameObject ->Create Other ->Particle System:

Just create a new particle system game object.
After doing that, a Game Object with three components, an Ellipsoid Particle Emitter, Particle Animator and a Particle Renderer will be created. If your billboard is just a single static image, there is no need for the Particle Animator component, so you might as well remove it.
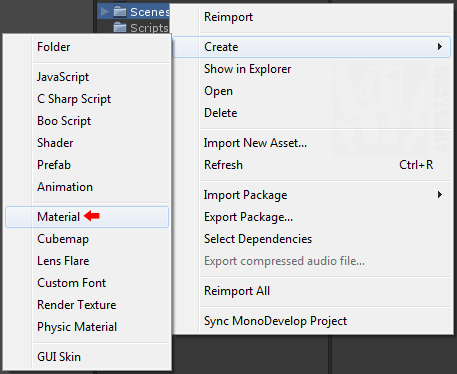
The next step is to create a Unity Material object by right-clicking anywhere inside the Project tab and them, select Create->Material:

Creating a material is just a simple as creating the particle system.
This material is going to be used as a texture to the particle system. Now, select this material on the Project Tab and set its texture at the Inspector — just drag and drop a image into the Texture2D slot, like this:

Drag and Drop Image file into the material's Texture2D slot.
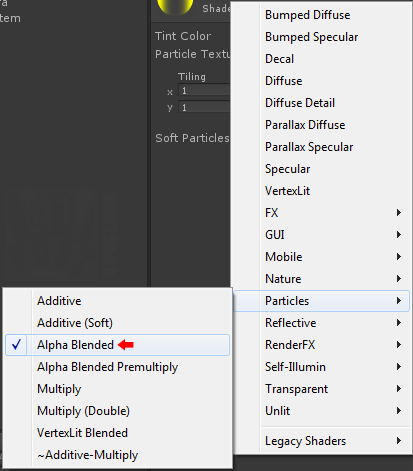
If your image has some kind of transparency don’t forget to select the Alpha Blended particle shader, by selecting Shader->Particles->Alpha Blended:

Select 'Alpha Blended', or any other particle shader depending on the effect you want.
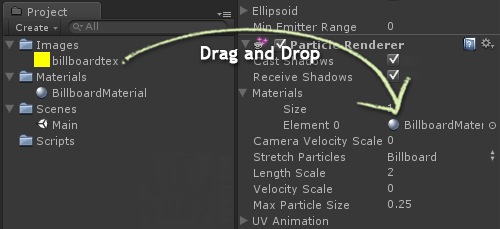
Other particle shaders can be used too, it’s up for the reader to decide which one is the best. Finally, it’s time to add this material to the Particle Renderer component, and to accomplish that, simply drag the material at the Project tab to the Materials slot, at the Particle Renderer component.

Drop the material into the 'Particle Renderer' component.
The last required step is to configure the two components at the Particle System game object as follows:
- Ellipsoid Particle Emitter
- Emit: true.
- Min Size: Any size that makes sense for that particular billboard.
- Max Size: Same as Min Size.
- Min Energy: 0.
- Max Energy: 0.
- Min Emission: 1.
- Max Emission: 1
- …
- Every numerical value from now on should be set as zero for this component.
- …
- Rnd Rotation: false.
- Simulate in Worldspace: false.
- One Shot: true.
- Ellipsoid X, Y, Z and ‘Min Emitter Range’ should also be zero.
- Particle Renderer
- Cast Shadows: your choice.
- Receive Shadows: your choice.
- Materials: explained above.
- Camera Velocity Scale: 0.
- Stretch Particles: Billboard, Horizontal Billboard or Vertical Billboard. Billboard will do in most of the cases.
- Length Scale: 0.
- Velocity Scale: 0.
- Max Particle Size: leave as is, but increase it if your billboard exceeds this size on the screen.
- UV Animation: all values must be set to 1.
This is what it should look like after setting these values (click to enlarge):
It should be working as a billboard right now. The advantages in using Unity’s particle system to make a billboard is that it’s easy to set up and you can use the Particle Animator component to make an animated billboard. Also, since it’s a particle, there is the possibility of setting other particle parameters, such as billboards appearing with different sizes at different rates, set a lifespan for each billboard, just to name a few.
The most noticeable disadvantage is that it’s overkill to create a Particle System just to render one static particle. It’s computationally expensive operation that could lead to a performance drop, so use it wisely.


