Unity: Throttle Controller
Posted by Dimitri | Jun 8th, 2011 | Filed under Programming

This Unity programming tutorial will explain how to create a script that translates the containing game object forward at a pre-defined speed rate. This rate is controlled by a throttle much like the ones found in boats, planes or even trains. As usual, a Unity project with a working demonstration of this code is available at the end of the post.
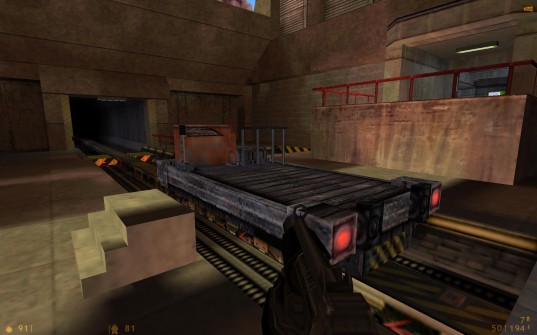
The inspiration behind this tutorial came from the first Half-Life game, in which a train at the end of the tutorial level can have its velocity is gradually set by the player. Some of you may not remember how it looked like, so here’s a screenshot:
The below script will add the same behavior to the game object it is attached to. Here’s the code:
using UnityEngine;
using System.Collections;

public class ThrottleController : MonoBehaviour
{
	//The game object's Transform
	private Transform goTransform;

	//the throttle increment to the current velocity
	private float increment=0.0f;
	//this variable stores the vertical axis values
	private float vertAxis=0.0f;
	//the throttle
	private float throttle =0.0f;

	void Awake ()
	{
		//get this game object's Transform
		goTransform = this.GetComponent<Transform>();
	}

	void Update ()
	{
		//Get the vertical input value and store it at the vertAxis variable
		vertAxis = Input.GetAxis("Vertical");

		//change the 'increment' value based on the vertical input
		if(vertAxis>0)
		{
			increment = 0.05f;
		}
		else if(vertAxis<0)
		{
			increment = -0.05f;
		}

		//after releasing the vertical axis, add the increment the throttle
		if(Input.GetButtonUp("Vertical"))
		{
			throttle = throttle+increment;
		}

		//set the throttle limit between -0.05f (reverse) and 0.25f (max speed)
		throttle=Mathf.Clamp(throttle, -0.05f,0.25f);

		//translates the game object based on the throttle
		goTransform.Translate(throttle * Vector3.forward);

		//rotates the game object, based on horizontal input
		goTransform.Rotate(Vector3.up * Input.GetAxis("Horizontal"));
	}
}
In essence, the script will check if one of the vertical axis buttons had been pressed and released. Then, the increment will be calculated based on the vertical input and added to the throttle variable, setting the speed rate in which the game object should move. That’s the main idea behind it.
So, the first thing that’s happening there is the declaration of the Transform variable named goTransform (line 19). It will be used later on the code to store the game object’s Transform. Next, we have three floats being declared and initialized: the increment, that changes the throttle’s value; the vertAxis that stores the result of the keyboard input, at a -1 (down) to 1 (up) range; and finally the throttle, that sets the rate in which the game object will move (lines 10,12 and 14).
Then, there’s a single line of code in the Awake() method, which initializes the goTransform variable (line 19). Next, on the Update() method is where is all happens.
Inside it, the vertAxis variable takes the vertical axis input (line 25). That line is followed by a if-else statement, that checks whether the vertAxis is positive or negative. If it’s positive, the increment is set to be 0.05f. Case it is negative, the increment will be equal to -0.05f (lines 28 through 35).
The last if statement adds the increment value to the throttle variable only after the vertical input buttons have been released (lines 38 through 41). This gives the player a better control of the throttle, since it won’t go straight into the max or the minimum allowed values, which are set with line 44. Because the throttle is incremented at a 0.05 base, the range of -0.05 to 0.25f should be fine, allowing one throttle position to reverse the game object, and five different rates of speed to move the game object forward.
Finally, line 47 translates the game object forward or backward, using the throttle‘s value to determine the velocity. The game object also needs to rotate! That’s why line 50 was added to the code.
That’s it! Please, don’t forget to comment! Here’s the demo Unity project:


Nice tutorial! I spend ages working this out when I first started doing games programming and I doubt my final solution was quite so tidy!