Android: how to rotate a View element
Posted by Dimitri | Jun 22nd, 2012 | Filed under Featured, Programming
Another Android programming tutorial, this time, explaining how to rotate a View element using two distinct approaches. Not only that, but this post also presents a brief explanation on the advantages and disadvantages of each approach. The code featured here has been tested on both the emulator and on a real device running Android 2.1 . Before going any further, please bear in mind that from Android 3.0 (API level 11), a setRotation() method has been added to the View class, therefore, it should be used instead of the code described in this article, which focuses on lower level APIs.
The first and perhaps most direct method of rotating a View element is to create a class that inherits from a View widget that needs to be rotated, for example, the TextView or the Button. Then, inside this class, the onDraw() method must be overridden. Inside it, the current Canvas matrix is manipulated, so that the View element is rotated. Below, the code for a class that renders a TextView with a 45 degree rotation:
package fortyonepost.com.rotatedview;

import android.content.Context;
import android.graphics.Canvas;
import android.util.AttributeSet;
import android.widget.TextView;

public class AngledTextView extends TextView
{
	public AngledTextView(Context context, AttributeSet attrs)
	{
		super(context, attrs);

	}

	@Override
	protected void onDraw(Canvas canvas)
	{
		//Save the current matrix
		canvas.save();
		//Rotate this View at its center
		canvas.rotate(45, this.getWidth()/2, this.getHeight()/2);
		//Draw it
		super.onDraw(canvas);
		//Restore to the previous matrix
		canvas.restore();
	}
}
The code should be self explanatory. By placing a AngledText at the main.xml layout file, the first disadvantage of using this approach becomes very noticeable: the drawing area still uses the original width and height of the element, before the rotation. So, the text appears to be cropped:
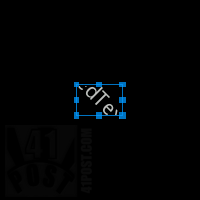
This screenshot shows how the rotated TextView is previewed by the ADT layout tool.
To address that problem, just change the View’s width at the Properties tab. Change both width and height of the the View from wrap_content to the same numerical dp value. Also, set the Text gravity to fill_vertical and center_horizontal. With those two alterations, the AngledText will look like this:
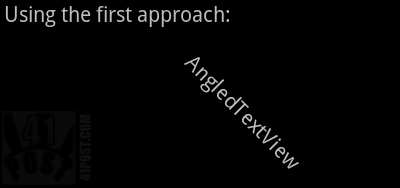
In this example, both width and height of the View were set to 110dp.
Another additional problem generated by this approach of rotating View elements is that a Button, or any other View composed by multiple elements won’t be able to be rotated correctly. Take a look at this screenshot of a rotated Button using the method described above.
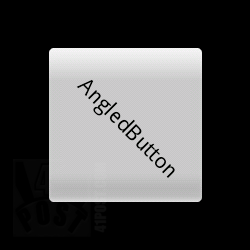
Using this method, only the foremost element is rotated. In this case, the button background is rendered at the same place while only the text label gets rotated.
The advantage of using this method is that it’s possible to preview the rotated element at the layout.xml file before running the application, at least when using Eclipse. By knowing how much space the View will take, it’s easier to create the rest of the application’s layout.
The second approach is way less obvious but can be applied to a greater number of View widgets. It consists of creating an Animation object and bind it to the View element to rotate it. Here’s how to rotate a TextView and a Button using this approach:
package fortyonepost.com.rotatedview;

import android.app.Activity;
import android.os.Bundle;
import android.view.animation.Animation;
import android.view.animation.RotateAnimation;
import android.widget.TextView;
import android.widget.Button;

public class RotatedViewActivity extends Activity
{
	//The animation that rotates the Button and the TextView
	Animation animation;

	//Some View elements to be rotated
	TextView tv;
	Button bt;

    /** Called when the activity is first created. */
    @Override
    public void onCreate(Bundle savedInstanceState)
    {
    	super.onCreate(savedInstanceState);
    	setContentView(R.layout.main);

    	tv = (TextView) findViewById(R.id.tv_test);
    	bt = (Button) findViewById(R.id.bt_button);

    	//Initialize the Animation object
    	animation = new RotateAnimation(45.0f, 45.0f, 0, 0);
    	//"Save" the results of the animation
    	animation.setFillAfter(true);
    	//Set the animation duration to zero, just in case
    	animation.setDuration(0);

    	//Assign the animation to the TextView
    	tv.setAnimation(animation);
    	//Assign the animation the the Button
    	bt.setAnimation(animation);
    }
}
The code above declares an Animation object, followed by a declaration of a TextView and a Button (lines 13 through 17). Both View elements are being inflated from the main.xml file (lines 26 and 27). The animation is initialized at line 30, as a RotateAnimation. As the name suggests, this class animates a View by rotating it from the desired to the target angle. The initialization takes four parameters: the angle to rotate from, the angle to rotate to and the X and Y coordinates of the rotation pivot. Since the initial and final rotations are the same, the View is just positioned at a 45 degree angle, with no animation.
Another essential line of code to makes this approach work is to call the setFillAfter() method passing true as the parameter (line 32). By doing so, all the transformations achieved by the animation will remain on the screen. In this case, the Button stays slanted at a 45 degree angle.
The next line of code isn’t really necessary, it’s there just to set the animation duration to zero (line 34). Normally, the RotateAnimation constructor previously initialized as the Animation object will have the duration equal to zero. However, if that changes in a future API update, the code will already take care of it.
Finally, the Animation object is bound to the TextView and the Button by passing it as a parameter to the setAnimation() method of each object (lines 37 and 39). All that produces the following results when applied to a Button and to a TextView:
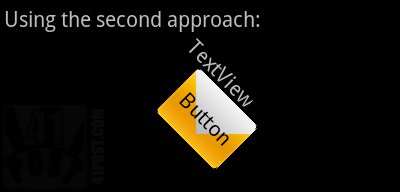
The last letter ('w') from the TextView is slightly cropped while using this second approach.
The advantages of using this approach of rotating Views are easily noticeable: it doesn’t require the creation of child classes that inherit from View widgets, the same animation can be applied to rotate multiple Views and most importantly, it’s possible to rotate View elements composed by various elements, such as the Button. The disadvantages are also quite clear: the rotated element can’t be previewed in Eclipse, the additional space taken by the rotation isn’t considered, so elements could end up overlapping each other, and the View element can be rendered just a tiny bit cropped.
Additionally, all rotated Views interaction areas aren’t rotated. For example, by launching the above Activity, you will notice that the button collision detection area remains at the same place, even if the Button is being rendered at a 45 degree angle, like this:

As can be seen on this and on the previous image, the Button still detects touch events as if it has never been rotated. Only the white area detects button presses.
By using the code above, the only way to get a Button area collision detection to work is to rotate the button by it’s center by 180 degrees. Also, if the button is a perfect square, a 90 or a 270 degree rotation might also make the Button work correctly.
On a side note: both two approaches presented on this post can be applied to a ViewGroup such as the LinearLayout. For the first approach, override the dispatchDraw() method instead of onDraw() method and do the same as described above. Don’t forget to call super.DispatchDraw() inside the overridden method. The second approach will work just fine as it is when applied to a ViewGroup, since this class also features a setAnimation() method.
That’s it! Here’s an example project with the code discussed in this post:
Downloads
What do you think? Do you have any tips to improve the View rotation code or this post? Please share your thoughts at the comments!


Hi,
Thanks for nice post.
Naveen
What a Pleasent Code you posted
Hi,
Its a really nice tutorial. It works very well, But i am facing an issue. I want to rotate my relative layout using the technique explained here (tried both techniques 1 and 2). My relative layout has one imageView with image set. The edges of image loss smoothness after rotation. The over all image is good, but only edges of image become distorted. I read it some where to enable anti aliasing. Can you please suggest how to do this with your tutorial.
If I apply this to a RadioButton the radio button is very tall and not very wide. How do I fix this?
Thanks!