Android: ADB remote emulator access
Posted by Dimitri | Oct 12th, 2012 | Filed under Programming
This post shows how to access an emulated Android device over a local area network, so you can test and debug applications on another computer. It’s a step by step explanation based on this thread on Stack Overflow. The main goal behind this post is to show just one of the possible ways of doing it. So, if you have a suggestion on how to improve or make this process more secure, please, feel free to comment below.
The technique described on this post has been tested on a computer with Windows 7 64 bit (the one that executes the emulator) and an Ubuntu virtual machine running on another computer. The Ubuntu PC is the one that is running Eclipse and the one where the applications are being coded. For the sake of simplicity, this tutorial will reference it as “dev machine“. The other PC, the one running Windows 7 64 bit, will execute the Android emulator, which will be remotely accessed. This PC will be referenced as “remote machine” from now on.
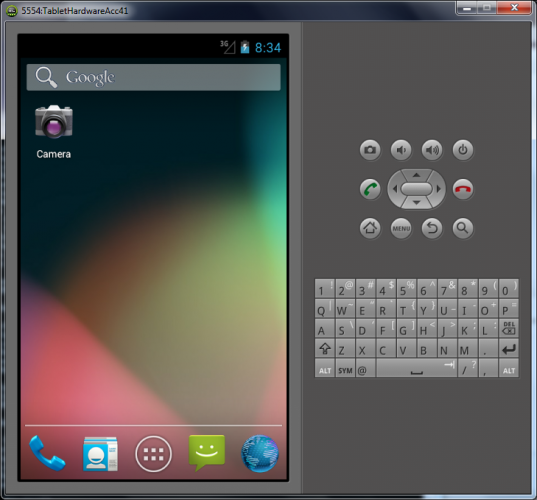
The first and most obvious action that must be taken is to install the Android SDK on both computers (if you haven’t already). The second step is to configure an Android device at the AVD on the remote machine and launch it. In this post, as an example, a virtual Android 4.1 device has been created and launched:
Also, since the remote machine isn’t going to debug or receive commands from ADB, you can safely disable it by calling adb kill-server. While not necessary, this may prevent problems like two instances of the ADB accessing the same emulated Android device at the same time.
With the emulator started at the remote machine, look at the window title. It’s composed by the the emulator port number and the device name. If there were no previous emulated devices running prior to starting this device, this port should be 5554. This port number is the one that the device uses to output to the console is always even, meaning that, if you launch another emulated device through AVD, it will use the next even port to output to the console, so it’s going to be 5556. And know that the console uses ports from the range starting at 5555 and ending in port 5585 for emulated devices.
And what about the odd ports in this interval? These are the ones that the ADB uses to connect to the virtual device, the ones we are interested in. So, the console and ADB connection are set in pairs for the emulated devices. Eg.: 5554 and 5555 for the first emulated device console and ADB connections; 5556 and 5557 for the second, and so on, up until the 5584/5585 pair.
Therefore, in our example, to connect ADB from the dev machine to the remote machine running the virtual Android device, a port must be forwarded to 127.0.0.1:5555. This port can be any set to any that’s not in use by the remote machine, but since the ADB already connects to emulated devices from port 5555 to 5585, it’s better to stick to one of the even numbered ports on that range. This example will use the 5585 as the port for incoming connections. Remember that this tutorial still haven’t moved on to the configuration that needs to be done on dev machine, it’s just describing the necessary steps on the remote machine.
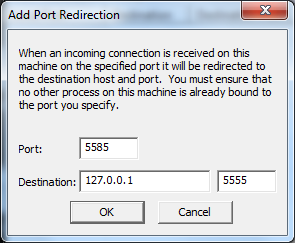
To forward a port in Windows, you can use this program conveniently named Port Forwarding For Windows created by QuantumG. Download and run this program on the remote machine and go to Redirection->Add. Fill the Port field with 5585 and the Destination Port with 127.0.0.1:5555:

Fill the Port field with 5585 and the Destination Port with 127.0.0.1:5555.
Get the IP address of the remote machine and write it down. On Windows, you can find that out by launching the Command Prompt and typing ‘ipconfig /all‘. That’s all that is needed to be done to the remote machine. Now, at the dev machine, run these commands:
adb kill-server
adb connect REMOTE_MACHINE_IP:5585 /*Replace REMOTE_MACHINE_IP with the IP address of the remote machine*/
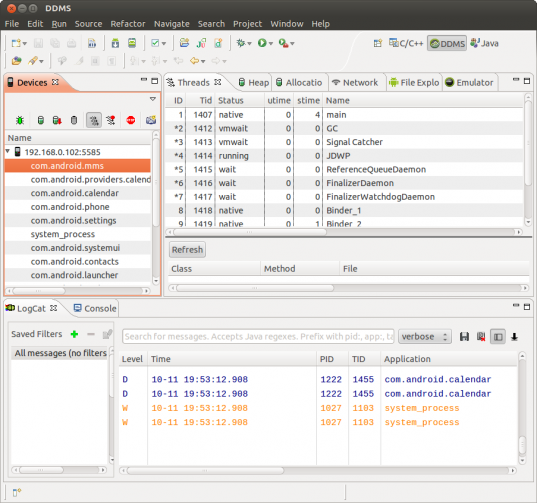
Of course, you’ll need to replace REMOTE_MACHINE_IP with the IP address of the remote machine. The ADB should start without problems on the specified port. At this point, opening Eclipse at the dev machine, and go to the DDMS view. It will display the emulated device from the remote machine:
Also, if you look at the Port Forwarding For Windows at the remote machine, you should see a number 1 at the # Connections column, meaning that there’s one active connection. That’s it, you should be able to deploy and debug applications on the emulated Android device at the remote machine from the dev machine.
To revert changes and use ADB normally, just kill ADB at the dev machine and restart it:
adb kill-server
adb start-server
At this point, you can safely close the emulated devices at the remote machine.
Final Thoughts
To sum up the process: start an emulated device through AVD; port forward it’s ADB port; write down the remote machine IP; connect ADB on the dev machine to the remote machine IP and forwarded port. To close all remote ADB connections, close and restart the ADB device (adb kill-server; adb-start-server;).
This method works alright, although I wasn’t able to run or debug applications that uses OpenGL ES 2.0 on an emulated device on the remote computer, even with GPU emulation enabled. Additionally, I’ve tested it over a wired connection, I don’t know how stable it is over a wireless connection or what problems that may cause. Also, I’m pretty sure this isn’t the most secure way to do it. You should probably use a SSH encrypted connection.
To connect to an additional Android virtual device at the remote machine, just use the remote machine’s IP and a port that must be forwarded to the next available ADB connection port. For example, for a second device, you’ll need another forwarded port to 127.0.0.1:5557 like 5583, for instance. And don’t forget to execute the command: adb connect REMOTE_MACHINE_IP:5583, to connect to this second Android virtual device.
Be the first to leave a comment!


