Android: Change color of the standard button inside Activity
Posted by Dimitri | Feb 13th, 2013 | Filed under Programming
This post explains how to change the color of the standard Android button. It also shows how to change the color of the text inside those buttons. It goes into detail on how to create a ColorFilter effect that changes the color of the button using three different approaches . The code featured in this post has been tested on Android 2.1, 2.2, 2.3 and 4.0.
Before starting, a little advice: know that changing the color of the standard Android button through XML is an easier and more straightforward approach. For that, please refer to the link Custom color buttons for Android (9-Patch). If the button color isn’t going to be changed after the application is initialized, then use XML. If that isn’t the case, then do it programmatically, which is what this tutorial focuses on.
So, here’s the code:
package fortyonepost.com.colorbuttonprogrammatically;

import android.app.Activity;
import android.graphics.PorterDuff;
import android.os.Bundle;
import android.widget.Button;

public class ChangeButtonColor1 extends Activity
{
	//The Button that will have its color changed
	private Button bt_exButton;

	@Override
	protected void onCreate(Bundle savedInstanceState)
	{
		super.onCreate(savedInstanceState);
		setContentView(R.layout.activity_main);

		//Inflate the Button object using the data at the 'activity_main.xml' file
		this.bt_exButton = (Button) this.findViewById(R.id.bt_exbutton);

		//Changing the background color of the Button using PorterDuff Mode - Multiply
		bt_exButton.getBackground().setColorFilter(0xFFBBAA00, PorterDuff.Mode.MULTIPLY);

		//Set the color of the text displayed inside the button
		bt_exButton.setTextColor(0xFF0000FF);

		//Render this Button again
		bt_exButton.invalidate();
	}
}
First, a Button object is declared (line 11). Then, the onCreate() method sets the content of the View from the ‘activity_main.xml‘ file (line 17). With that, the Button can be inflated from the XML file (line 20). Finally, the color of the background of the button is changed at line 23.
There’s lots of things going on there, so let’s see some details of exactly what’s happening. The Android Button class doesn’t allow too much tinkering with the underlining Drawables that composes the Button View widget, or any other standard View widget for that matter. However, there’s is a method that retrieves the Drawable used as the Button background, aptly named getBackground(). From that Drawable, a call to the setColorFilter() method is made. It takes two arguments, an integer as the color in a ARGB hexadecimal format and a PorterDuff.Mode.
The integer that represents the color is composed of four hexadecimal pairs in the ARGB format. The first two values correspond to the alpha channel, the other three value pairs are, respectively, the red, green and blue color channels. That said, the 0xFFBBAA0000 value is: 255 (FF) alpha, 187 (BB) red, 170 (AA) green and 0 (00) blue, so this color is kind of a dark yellow.
The last parameter is PorterDuff.Mode.Multiply, which means that the color passed on the first argument and the colors already on the button are going to be multiplied. Essentially, the PorterDuff.Modes behave a lot like the blending functions in OpenGL by defining what the color of a pixel on the screen will be based on source (incoming) and destination (existing) color information.
In essence, the setColorFilter() method is creating a new ColorFilter object with those parameters and applying it to the Drawable is the background of the button. By doing that, the background button is “tinted”.
Finally, the method setTextColor() is called (line 26) and it takes a color as an integer on the same ARGB format previously explained. As the name suggests, this method changes the color of the text inside a button. The last bit of code flags the system that this View widget needs to be redrawn. Without that, the color changes made to the button can’t be immediately seen, unless you click on it (line 29).
Here’s a screenshot of the above code in action on Android 2.3:

The standard Android button with the multiplied background and blue text color.
Here’s another Activity that yields the same results but uses another type of ColorFilter:
package fortyonepost.com.colorbuttonprogrammatically;

import android.app.Activity;
import android.graphics.LightingColorFilter;
import android.os.Bundle;
import android.widget.Button;

public class ChangeButtonColor2 extends Activity
{
	//The Button that will have its color changed
	private Button bt_exButton;

	@Override
	protected void onCreate(Bundle savedInstanceState)
	{
		super.onCreate(savedInstanceState);
		setContentView(R.layout.activity_main);

		//Inflate the Button object using the data at the 'activity_main.xml' file
		this.bt_exButton = (Button) this.findViewById(R.id.bt_exbutton);

		//Changing the background color of the Button using a LightingColorFilter
		bt_exButton.getBackground().setColorFilter(new LightingColorFilter(0xFFBBAA00, 0x00000000));

		//Set the color of the text displayed inside the button
		bt_exButton.setTextColor(0xFF0000FF);

		//Render this Button again
		bt_exButton.invalidate();
	}
}
This is the same as the previous Activity, except for line 23. There, a LightingColorFilter is being passed as a parameter to the setColorFilter() method. The LightingColorFilter not only multiplies a supplied color but also adds an additional color to the current button’s Drawable background. That’s why the parameters are is an hexadecimal ARGB color format. The first one (0xFFBBAA00) is the color the button’s background is being multiplied by and the second one is (0x00000000) an additional color value to that’s going to be added to the button’s background. Again, it’s going to have the same results as the previous code. Since this parameter is 0, the color gets multiplied.
To have even more control of the color that’s going to be multiply with the button’s background, there’s a third method which involves the use of a ColorMatrixColorFilter. The ColorMatrixColorFilter is a color effect that applies a ColorMatrix on a set of pixels, in this case, on the button’s Drawable background. For more information on what a color matrix is, please take a look at: StackOverflow – Understanding the Use of ColorMatrix and ColorMatrixColorFilter to Modify a Drawable’s Hue.
And this is the resulting code:
package fortyonepost.com.colorbuttonprogrammatically;

import android.app.Activity;
import android.graphics.ColorMatrixColorFilter;
import android.os.Bundle;
import android.widget.Button;

public class ChangeButtonColor3 extends Activity
{
	//The Button that will have its color changed
	private Button bt_exButton;

	@Override
	protected void onCreate(Bundle savedInstanceState)
	{
		super.onCreate(savedInstanceState);
		setContentView(R.layout.activity_main);

		//Inflate the Button object using the data at the 'activity_main.xml' file
		this.bt_exButton = (Button) this.findViewById(R.id.bt_exbutton);

		//Set the color that the button background will be multiplied with
		int bgColor = 0xFFBBAA00;

		/*Separate each hexadecimal value pair from the bgColor integer and store
		 * each one of them on a separated variable.*/
		int a = (bgColor >> 24) & 0xFF;
	    int r = (bgColor >> 16) & 0xFF;
	    int g = (bgColor >> 8) & 0xFF;
	    int b = (bgColor >> 0) & 0xFF;

	    /*Create a new ColorMatrixColorFilter passing each individual component
	    of the ColorMatrix this filter uses as a float array.*/
	    ColorMatrixColorFilter cmFilter =
	    		new ColorMatrixColorFilter(
	    		new float[]{r/255f,0,0,0,0,
	    					0,g/255f,0,0,0,
	    					0,0,b/255f,0,0,
	    					0,0,0,a/255f,0});

	    //Set the cmFilter as the color filter
	    bt_exButton.getBackground().setColorFilter(cmFilter);

		//Set the color of the text displayed inside the button
		bt_exButton.setTextColor(0xFF0000FF);

		//Render this Button again
		bt_exButton.invalidate();
	}
}
Again, this is exactly as the first Activity featured at the beginning of this post, however the code for the ColorFilter on this one is quite different. Before creating and applying any effect to the Drawable the hexadecimal ARGB color is being stored at the bgColor integer (line 23). After that, each color component is them separated and stored on a new integer variable, by taking the original hexadecimal ARGB color value stored at bgColor and shifting its bits to right and leaving only the last two most significant bits, which is accomplished, respectively, by the ‘>>’ and ‘&’ bitwise operators (lines 27 through 30).
It’s not in the scope of this tutorial to explain in detail how bit shifting and bitwise operations work. To better understand it, please take a look here and here. Although written for C++, the same concepts apply for Java.
Back to the code, a ColorMatrixColorFilter object is created and initialized. The constructor used for initializing this filter takes a float array that is the content of the ColorMatrix this color filter relies on (lines 34 through 39). Note that the a, r, g, b integers are being divided by 255. This is being done to clamp the value of each color channel between a 0.0 ~ 1.0 range. To wrap it up, the ColorMatrixColorFilter is applied to the Drawable background of the button at line 42.
In terms of code, this third option is the most complex, but it allows greater control of the colors the button background is being multiplied with. In addition, the ColorMatrixColorFilter opens up new possibilities for changing the color programmatically, such as changing the hue, brightness and saturation. For an example on how to change the saturation using the ColorMatrix, refer to this other tutorial on 41 Post: Android: changing image color saturation.
Final Thoughts
Again, it’s worth mentioning that the same could be achieved through XML. If there’s no need to change the color of a button after the application View has been loaded, then go for the XML solution. Doing this programatically isn’t quite as straightforward as one would image, so the code isn’t as easy to maintain.
Also, don’t forget to call the invalidate() method of the Button, or else the changes made to it won’t be reflected immediately.
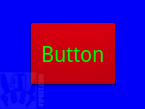
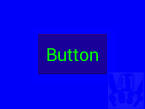
The results will be different when running this code on applications or Android devices that uses custom themes. Because of that, there’s a difference when running this code on Android 4.0 and 2.3, caused by the Holo theme. As stated on the beginning of the post, the code featured on this post works on Android 4.0, but since the Holo theme features slightly translucent buttons, the final result is different. Take a look at those two screenshots, one taken on Android 2.3, and the other one taken on Android 4.0:

Button with multiplied background color and green text color on Android 2.3

Button with multiplied background color and green text color on Android 4.0
Therefore, devices with custom user interfaces, such as the ones that use the HTC Sense will render the buttons differently. In other words, the results of the color information multiplication will be different since the source button background Drawable is different.
This code can’t be applied to other View widget elements in the way it is now, even though they inherited the the getBackground() method from the View class. For instance, the CheckBox and the SeekBar classes are children of the View class. If you call the getBackground() method on both of them, the former will return a Drawable that is probably behind other elements, so changing it’s color has no visible effect. The latter returns null. So be careful, the getBackground() method isn’t guaranteed to return the Drawable expected, it can even return no Drawable at all. This has been made very clear on this method’s documentation.
In order to change the Drawable elements that composes a View widget, the ID of the specific resource is required. Doing that is a whole other story.
That’s it! As usual, please leave a comment.
//Inflate the Button object using the data at the ‘activity_main.xml’ file


Hi !! thank you for theese example!!
I have a problem with the first one : when I use bt_exButton.setTextColor I can change the color of the text but with bt_exButton.getBackground().. i can’t change it. Why?
thanks !!
Mark
I think that’s because bt_exButton.setTextColor() takes an hex integer as the color that the text will be rendered with.
The button background, on the other hand, is the Drawable returned by the bt_exButton.getBackground() method.
You can’t simply assign a color to it, you must multiply the desired color with the background.