Unity and Android: Create an Unity app with a custom layout
Posted by Dimitri | Apr 28th, 2015 | Filed under Featured, Programming

Although Android and Unity3D are both common topics here at 41post.com, this tutorial is the first one featured in this website to combine those two topics into a single post.
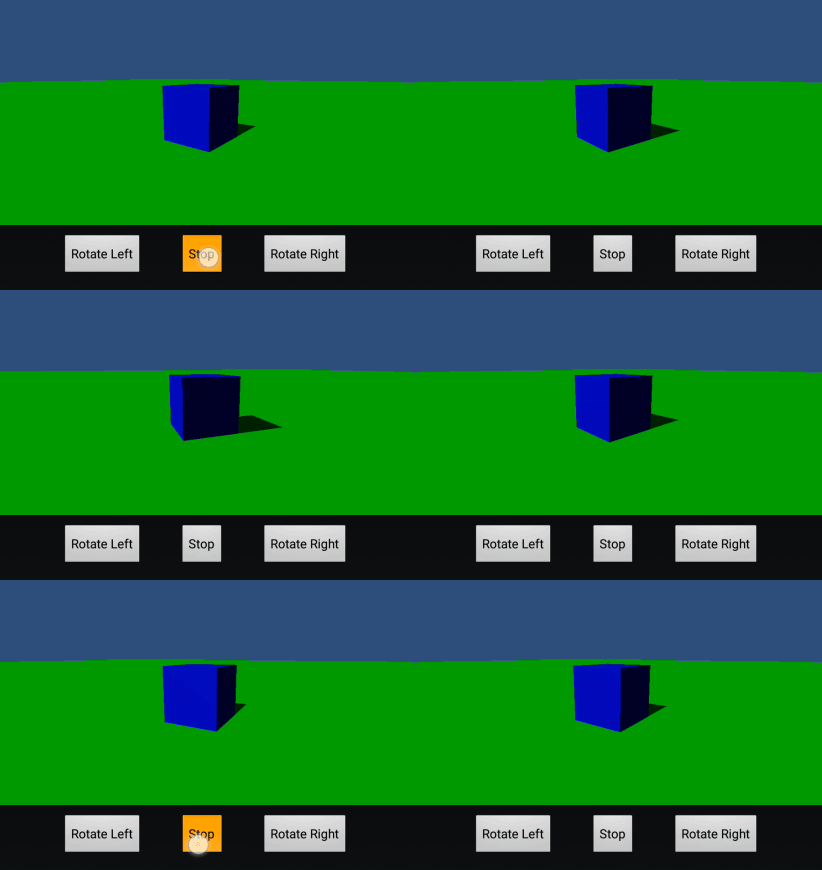
So, this first Unity/Android post is going to show how to create an Unity Android application that uses a custom layout which makes the Unity View to take up only part of the screen. Additionally, this post shows how to have some Android buttons underneath that View and how to make them interact with Unity. And as a simple example, those buttons will determine which direction the camera should rotate around a blue box. As usual, there’s a sample project is available at the end of the post. Here’s a GIF illustrating how the application looks and behaves:

The View used by Unity only takes part of the screen. The three buttons are native Android UI buttons.
Secondly, a Unity script that can be accessed through Java must be created. To do that, a method which returns void and passes a string must be created. Here’s the code:
using UnityEngine;
using System.Collections;

public class RotateAround : MonoBehaviour
{
	//This game object's transform
	private Transform goTransform;
	//The target transform
	public Transform targetTransform;
	/*The direction of the rotation of the game object this script is
	 attached to. It's either 0 or one*/
	private int rotationDirection = 0;

	void Start()
	{
		this.goTransform = this.GetComponent<Transform>();
	}

	void Update()
	{

		this.goTransform.LookAt (this.targetTransform.position);

		//Rotate around the targetTransform
		this.goTransform.RotateAround (this.targetTransform.position, Vector3.up,
		                               Time.deltaTime * rotationDirection * 7f);
	}

	/*This method will receive the message sent by the Java code. The
	*signature is important./
	void ReceiveRotDir(string message)
	{
		if (string.Equals (message, "R"))
		{
			this.rotationDirection = -1;
		}
		else if (string.Equals (message, "L"))
		{
			this.rotationDirection = 1;
		}
		else //Set it to zero
		{
			this.rotationDirection = 0;
		}
	}
}
The member variable declarations are pretty straightforward: there are two Transform(s), one to store the current game object Transform and the other one that is set as public, so it can be assigned in the Inspector. In this tutorial, it was assigned to the blue box. The other member variable is a integer, that will store 0, 1 or -1 (lines 6 through 12).
Next, there’s the Start() method retrieves and stores the current game object’s Transform into the goTransform member variable (lines 14 through 17). The Update() method makes the current game object the script is current attached to “look at” the targetTransform (line 22). Additionally, it makes the game object holding the script to rotate around the targetTransform. Note that the rotationDirection is passed as the third parameter (line 25).
As the name suggests, this variable determines the orbit direction of the object by assuming the values of either 0,1 or -1. These values are determined inside a simple if/else statement inside the ReceiveRotDir() method. Therefore, when the string parameter passed as a parameter is R, the game object that holds the script will start it’s rotation rotation around the target by the right side. The same goes for L, however the orbiting takes place in the other direction. If anything else is passed, rotationDirection is set to zero so the game object doesn’t move (lines 32 through 46).
One important note about this method is its signature. It returns void and accepts only one parameter which is a string. This is a requirement when passing information from Java to Unity when using the steps described in this post. It needs to have that signature, otherwise it won’t work. For simplicity’s sake, please know that the way the following script is written to receive data from Java is not the most optimized and there is another way to get around the method signature limitation. However, it is much more complicated (please refer to the Closing Comments below).
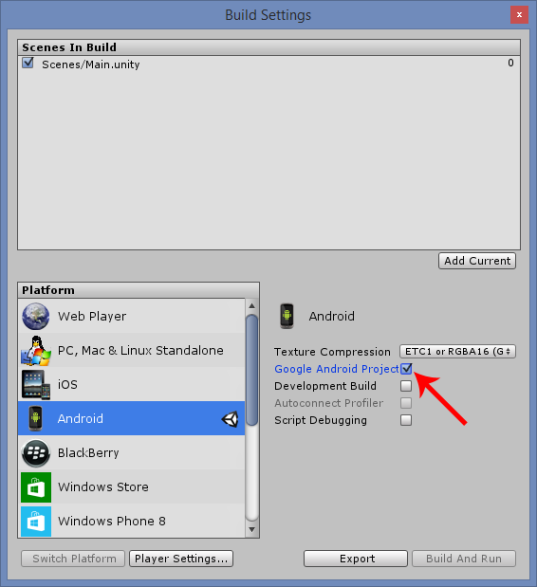
The third step is to build the Unity project for Android. If you never did that, head to Unity: Getting Started with Android Development that shows how to do it in more detail. In a nutshell, the Android SDK and the Java JDK need to be installed prior to exporting an Unity project as an Android app. Also, as a minimum, the name of the Bundle Identifier must be defined in the Player Settings. Now, back to this tutorial, when exporting, mark the checkbox Google Android Project, as show:

Don’t forget to check the option Google Android Project
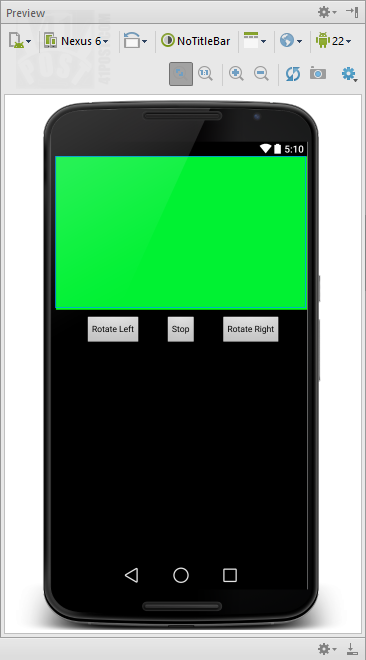
After having your Unity project exported, the forth step is to import the Android project generated by Unity into Eclipse or Android Studio. For this post, Android Studio is being used. Then, just create a layout named main.xml with a FrameLayout and assign an id to it. That FrameLayout is the area where the exported Unity application/game will be rendered. Also, three buttons were added right below that FrameLayout. Here’s a screenshot of the preview of the main.xml file:

The FrameLayout was set to green just to make it easier to preview how much screen space the the Unity app/game will take.
Here’s the main.xml file source code:
<?xml version="1.0" encoding="utf-8"?>
<RelativeLayout xmlns:android="http://schemas.android.com/apk/res/android"
    android:layout_width="match_parent" android:layout_height="match_parent"
    android:rowCount="3"
    android:columnCount="10">

    <FrameLayout
        android:layout_width="match_parent"
        android:layout_height="250dip"
        android:id="@+id/fl_forUnity"
        android:background="#ff00ff15"
        android:layout_column="4"
        android:layout_row="0"
        android:layout_alignParentTop="true"
        android:layout_centerHorizontal="true">

    </FrameLayout>

    <Button
        android:layout_width="wrap_content"
        android:layout_height="wrap_content"
        android:text="Rotate Right"
        android:id="@+id/bt_rotRight"
        android:layout_column="4"
        android:layout_row="2"
        android:layout_alignTop="@+id/bt_stop"
        android:layout_toRightOf="@+id/bt_stop"
        android:layout_toEndOf="@+id/bt_stop"
        android:layout_marginLeft="30dp" />

    <Button
        android:layout_width="wrap_content"
        android:layout_height="wrap_content"
        android:text="Rotate Left"
        android:id="@+id/bt_rotLeft"
        android:layout_column="9"
        android:layout_row="2"
        android:layout_alignTop="@+id/bt_stop"
        android:layout_toLeftOf="@+id/bt_stop"
        android:layout_toStartOf="@+id/bt_stop"
        android:layout_marginRight="30dp" />

    <Button
        android:layout_width="wrap_content"
        android:layout_height="wrap_content"
        android:text="Stop"
        android:id="@+id/bt_stop"
        android:layout_below="@+id/fl_forUnity"
        android:layout_centerHorizontal="true"
        android:layout_margin="10dip" />

</RelativeLayout>
Don’t forget to assign an id to the FrameLayout since it will be referenced in the Activity code. In this example, the id of the FrameLayout is fl_forUnity (line 48).
The fifth step is to render the app/game inside inside that FrameLayout. The reason behind it is because of the way that UnityPlayer class is designed to work in Android. The UnityPlayer class is a child of the FrameLayout that holds a View inside it which actually renders the Unity game. Therefore, to render the exported UnityGame inside an specific area, all that is required is to append that View to our fl_forUnity FrameLayout. Here’s the code:
package fortyonepost.com.unityandroidcustomal;

/*Omitted imports*/
import android.widget.FrameLayout;
import android.widget.Button;

public class UnityPlayerActivity extends Activity
{
    protected UnityPlayer mUnityPlayer; // don't change the name of this variable; referenced from native code

    //Declare a FrameLayout object
    FrameLayout fl_forUnity;

    //Declare the buttons
    Button bt_rotLeft;
    Button bt_rotRight;
    Button bt_stop;

    // Setup activity layout
    @Override protected void onCreate (Bundle savedInstanceState)
    {
        requestWindowFeature(Window.FEATURE_NO_TITLE);
        super.onCreate(savedInstanceState);

        getWindow().setFormat(PixelFormat.RGBX_8888); // <--- This makes xperia play happy

        mUnityPlayer = new UnityPlayer(this);
        if (mUnityPlayer.getSettings ().getBoolean ("hide_status_bar", true))
        {
            setTheme(android.R.style.Theme_NoTitleBar_Fullscreen);
            getWindow ().setFlags (WindowManager.LayoutParams.FLAG_FULLSCREEN,
                    WindowManager.LayoutParams.FLAG_FULLSCREEN);
        }

        //setContentView(mUnityPlayer);
        //Set the content to main
        setContentView(R.layout.main);

        //Inflate the frame layout from XML
        this.fl_forUnity = (FrameLayout)findViewById(R.id.fl_forUnity);

        //Add the mUnityPlayer view to the FrameLayout, and set it to fill all the area available
        this.fl_forUnity.addView(mUnityPlayer.getView(),
                FrameLayout.LayoutParams.MATCH_PARENT, FrameLayout.LayoutParams.MATCH_PARENT);

        //Initialize the buttons from the XML file
        this.bt_rotLeft = (Button) findViewById(R.id.bt_rotLeft);
        this.bt_rotRight = (Button) findViewById(R.id.bt_rotRight);
        this.bt_stop = (Button) findViewById(R.id.bt_stop);

        /*Send a brodcast a message to the 'Main Camera' game object, passing L, R according to the
        pressed buttons.*/
        this.bt_rotLeft.setOnClickListener(new View.OnClickListener() {
            @Override
            public void onClick(View v) {
                UnityPlayer.UnitySendMessage("Main Camera", "ReceiveRotDir", "L");
            }
        });

        this.bt_rotRight.setOnClickListener(new View.OnClickListener() {
            @Override
            public void onClick(View v) {
                UnityPlayer.UnitySendMessage("Main Camera", "ReceiveRotDir", "R");
            }
        });

        this.bt_stop.setOnClickListener(new View.OnClickListener() {
            @Override
            public void onClick(View v) {
                UnityPlayer.UnitySendMessage("Main Camera", "ReceiveRotDir", " ");
            }
        });

        mUnityPlayer.requestFocus();
    }

//...Rest of the code omitted...//
Most of the code has been left exactly as Unity exported it. Therefore, only the major parts that changed are being shown. The first difference can be found right at the start, from line 12 through 17, a FrameLayout and three buttons are being declared. They are going to be used later in the code to store the reference to the FrameLayout and the three Button(s) defined at the main.xml layout file.
Moving on to the onCreate() method, instead of setting mUnityPlayer as the current View at line 35, the content is set to the main.xml layout file. At this point, the View that the UnityPlayer holds needs to be appended to the FrameLayout which was inflated from the XML file. That’s exactly what lines 40 and 43 achieve. Then, the addView() method is called. The addView() method adds child Views to the calling object. The first argument is mUnityPlayer.getView() and what that returns is the View that renders the game/app itself that has been previously mentioned. The second and third parameters are just LayoutParameters so that the game/app View takes up all of the space available space occupied in on the screen by fl_forUnity layout.
Finally, the last step is to define the action each button must perform when pressed. For this tutorial, the ‘Rotate Left’ button needs to call the ReceiveRotDir() method and pass the “L” as a parameter to it. To make that work, the static method UnityPlayer.UnitySendMessage() is called (line 56). The game object name that has the method to be called, the method name and the string to be passed to Unity are the parameters. In a nutshell, this method works the same as calling GameObject.Find() followed by a Component.BroadcastMessage() in Unity, however this is done from the Java Android side. This method only supports calling a Unity script method that returns void and takes a string as a parameter. That’s why it we had to write our RotateAround script the way we did back in the first step. The ‘Rotate Right’ and ‘Stop’ buttons follow the same logic (lines 60 through 72).
That’s it! Now it’s just a matter of running the application in Android and testing it.
Closing comments
There are some drawbacks that need to be mentioned. The most obvious one is that the UnityPlayer.UnitySendMessage() message only works with methods that are defined inside Unity scripts that receives a string as a parameter. That’s a big limitation that manifests itself even in this tutorial since passing a integer would be far more appropriate. Not only that, but UnitySendMessage() doesn’t offer a really good performance. According to the Unity Manual “calls to UnitySendMessage are asynchronous and have a delay of one frame”. I’ve tested that and that’s true, there is some delay when using UnitySendMessage(), sometimes even more than a frame. Therefore, it might not be a good idea to use it to send data from Java to Unity that is critical to every frame.
So, the correct way around that would be to create a custom Plugin for Android and call a Unity Script method through JNI, which is described in length here.
Also, the View that Unity instantiates inside the UnityPlayer class inherits from FrameLayout. In other words, it is a custom View. Normally, to instantiate those kinds of Views, it would be a matter of simply adding a Custom View element to the layout file, as described in this post. However, UnityPlayer doesn’t have the constructors to inflate it using a XML file. Therefore the view must be added in the Activity’s code, as described in the post.
Finally, it’s worth mentioning that Unity exports an Eclipse ADT project rather than an Android Studio project. In this tutorial, I left all the options checked in Android Studio when importing the Eclipse project generated by Unity.
Although not optimized, I think that this way of sending data from the Java code to a Unity script might be useful if the data being passed is small and is not required for each game update. Also, it is a way to figure out and test simple Android to Unity interactions before writing a plugin for Android.
References
- Unity Forums – Using Unity Android In a Sub View – Posted by tnetennba.
- Unity Manual – Building Plugins for iOS
- Unity Manual – Building Plugins for Android
Downloads
- u3d-a_app_custom_layout.zip About 58MB


Hello,
Thanks for this article.
I’m following this article to add a unity game inside on android activity, but I have some questions.
I can’t execute your project on my device, the project have a compilation error (ClassNotFoundException) do you have idea what is due this error?
I’m creating on my main activity the UnityPlayer, but android studio cannot resolve this symbol. I saw on your project that you have an external library with unity. What is the correct way to import that?
Thank you
Nice article that pointed me in the right direction for my own project.
Can you update the article and go more into detail on how to import an unity project in android studio. It is not really covered and a crucial step to get android studio compile and run the sdk on a device. Then we can get all fancy with new intents and layouts and buttons and what not.
Took me some time to get this working.
cheers!
“Julia’s Garland” (fr. Guirlande de Julie)